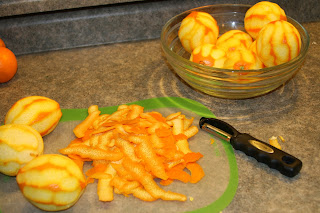
Yesterday, we attempted what is our first marmalade. One of the local supermarkets had a great deal on organic naval oranges. So, orange marmalade it was! When looking for recipes we ran into a lot of orange ginger marmalade (which sound amazing, but we didn't have any ginger root in the house and going back out was not an option). Here is the recipe that we decided on: Orange Marmalade.
This is a pretty easy recipe, if your interpretation is correct... That's the kicker...
Prep Time: 1 hour
Cook Time: 45 minutes
Total Time: 1 hour, 45 minutes
Yield: 3 pints
Ingredients:
- 5 pounds ripe oranges
- 6 cups sugar
- 3 pint jars with lids
Obviously, be sure that you thoroughly clean your oranges since you will be using each part of it in the making of your marmalade. Taking off the zest was fairly easy. We did, in fact, use a vegetable peeler as we assumed that'd be the easiest route. It takes some touch, but you eventually learn how to apply just the right amount of pressure so as not to scrape the pith with the zest. When it came time to prepare the zest for inclusion in the marmalade, we decided on a combination of slices and processed zest for aesthetics.
This isn't an exact science. Don't kill yourself trying to get off every centimeter of zest. You'll end up getting much too much pith, which is pretty bitter.
Just a couple cycles with the food processor and you get a nice finely chopped texture.
Like this!
Or, you can go with this one.
Here's where it got a bit dicey. Be sure that you read the above link regarding how to section oranges. You want to make sure that all of the membranes and core are separated from the "meat" of the fruit. Mr. B misinterpreted the separating method and it took 2 - 3 times as long as it should have to get to this point.
Once you have separated the core, membranes and anything other than the fruit, you can run it through a strainer, pressing hard, to collect any juices. Then, you will transfer it to what is referred to as a "pectin bag" that consists of a double layer of cheese cloth. You will notice that pectin is not used in this recipe. That's because the remnants contained in the "pectin bag" actually release your natural pectin.
Then, it is time to combine your zest, fruit, "pectin bag," four cups and water and six cups of sugar in a large pot. Bring to a boil and maintain a heat of 220 F for 5 minutes. They warn you that this may be tedious.
It is.
Be patient.
Once your marmalade has met the 220 for 5 criteria, you can then test it to see if it is at it's "gelling point." We go into deeper detail about how to test for "gelling point" here: Canning Cranberry - Apple Preserves . We used the plate test, for the first time. Typically, we use the spoon test. We weren't completely familiar with what the "clean path" meant in regards to the plate test and that got us jarring our marmalade a bit earlier than we should have.
While pretty, this still didn't set the next day. Not even close. Again, the recipe suggests that it may take up to 48 hrs for the marmalade to set, we're of the mindset that most of that work should be done before it goes into the jar. So, we looked for ways to reprocess our work and not completely scrap our hours of effort. We found a great one here: What to do when your jelly doesn't set.
A few tablespoons of lemon juice later and a little more time, orange marmalade. Using clean jars, lids, seals and collars, reprocess your yummy goods via water bath. A couple of things to note: Notice the difference in color from what we thought were the "finished" goods to what was actually our final product. The second has a distinctly darker tint to it. Be sure to study more than one recipe and know what kind of visual evidence you should be looking for. Also, notice how there are six half pints with the second? We had seven half pints, one pint and several smaller jelly jars with the first "finished" goods. Talk about reduction.
So, there you have it. You learn so much canning new recipes. Never stop learning. Especially, as it pertains to what you are feeding your family. It was quite the little adventure and we wish we would have done a couple of things differently (reading the entire recipe first and not just the ingredients is always a good start), but we are excited to pop open a jar and get our first real taste of our first real marmalade.
Have a marmalade recipe that you can't live without? Tell us in the comments!
Until then...
Keep Calm
and
Can On


