Monday, November 19, 2012

Jammin' Jellies and Jams!

Greetings, all!

We great apologize for our lack of presence the past few days.  Busy weekend in the Ward household, but feeling truly blessed for a weekend full of friends, family and canning!  There are a couple of recipes that we want to bring you, but, in the excitement of all of it, we totally forgot to take some prep pictures.  For that, we apologize, but the recipes are delicious, nonetheless!  Recipes are courtesy of tasteofhome.

Texas Jalapeno Jelly

The Goods:
  • 2 jalapeno peppers, seeded and chopped
  • 3 medium green peppers, cut into 1-inch pieces, divided
  • 1-1/2 cups white vinegar, divided
  • 6-1/2 cups sugar
  • 1/2 to 1 teaspoon cayenne pepper
  • 2 pouches (3 ounces each) liquid fruit pectin
  • About 6 drops green food coloring, optional
  • Cream cheese and crackers, optional
The Process:
  • In a blender or food processor, place the jalapenos, half of three Green peppers and 1/2 cup vinegar; cover and process until pureed.  Transfer to a large dutch oven (sauce pan).
  • Repeat with the remaining green peppers and another 1/2 cup vinegar.
  • Add the sugar, cayenne and remaining vinegar to pan.  Bring to a rolling boil over high heat, stirring constantly.  Quickly stir in pectin.  Return to a rolling boil; boil for one minute, stirring constantly.
  • Remove from the heat; skim off foam.  Add food coloring if desired.  Carefully ladle hot mixture into hot half-pint jars, leaving 1/4-inch headspace.  Remove air bubbles; wipe rims and adjust lids.
  • Process for 10 minutes in a boiling-water canner.  Serve over cream cheese with crackers if desired.  Yield:  7 half-pints.
The Verdict:

Tons o' flavor with just a hint of spice.  If you aren't a pepper fan, there is still a great chance that you will love Texas twist on jelly.  When serve as suggested (on top of crackers topped with cream cheese), there is a great balance of heat (I use that term lightly) and coolness.  Plus, this is a great companion gift for the holidays with your Cranberry Apple Preserves.


Cinnamon Blueberry Jam

The Goods:
  • 1 pound fresh or frozen blueberries (about 1 qt)
  • 3-1/2 cups sugar
  • 1 tablespoon bottled lemon juice
  • 1/4 teaspoon ground cinnamon
  • 1/8 group cloves
  • 1 pouch (3 ounces) liquid fruit pectin
The Process:
  • Crush blueberries; measure 2-1/2 cups and place in a large saucepan.
  • Add the sugar, lemon juice, cinnamon and cloves; bring to a rolling boil over high heat, stirring constantly.  Quickly stir in the pectin.  Return to a full rolling boil; boil for one minute, stirring constantly.
  • Remove from the heat; skim off foam.  Carefully ladle hot mixture into hot half-pint jars, leaving 1/4-inch headspace.  Remove air bubbles; wipe rims and adjust lids.  Process for 10 minutes in boiling water canner.  Yield: 4 half-pints.
The Verdict:

Not only pleasing to the eyes, this one is pleasing to the tummy, as well.  On bread, crackers or an english muffin, this deep-purple jam offers not only the traditional fruitiness of a typical jam or jelly, but also the richness of the cinnamon and cloves that are included.  You can literally dissect and analyze each of the unique flavors, but they coexist so wonderfully. 


So, there you have it!  A couple of jams and jellies that will make any commercial canned cranberry sauce jealous.  While we're on the topic, what are your favorite canned goodies to gift during the holidays?  Let us know in our comments section as we would love to hear from you!  If you leave a recipe, you never know.  You might just see your recipe featured on our next blog post!

Until then...

Keep Calm
and
Can On

Tuesday, November 13, 2012

Homemade Baby Wipes

Good evening, friends!

Sorry that it has been a minute since I posted, but I wanted to give you a quick shout-out!  We did can some chicken noodle soup yesterday/today, but I don't have a ton of time to get that up.  So, that'll have to wait until tomorrow.

When I first started this blog, I stated that I wanted to incorporate many ways to maintain a self-sustaining lifestyle in compliment to the world of canning.  I wanted to share with you an easy and whoa-economical way to make your own baby wipes.  With a three month old and (almost) two year old, you can go through baby wipes far too quickly and no matter how "cheap" you find them, it adds up quickly.  So, here's a quick an easy way to cut down on excess spending and treat your children's sensitive skin right.

The Goods:
  • 1 lg cylindrical tupperware
  • 2 cups water
  • 1/2 roll of paper towels
  • 2 tsp Dr. Bronner's Lavender Pure Castile Soap (or any kind of baby wash)
  • 2 tsp olive oil  (or any kind of baby oil)

The process:
  • Cut the paper towel roll in half with a serrated knife.
  • Combine the liquid ingredients into your tupperware.
  • Place half of the paper towel roll into the tupperware jagged side down so as to help facilitate absorption.
  • Place lid on tupperware.

  • When the halved paper towel roll is fully saturated, remove the center cardboard roll.


There you have it.  When broken down, the cost v. cost comparison is clear.  Of course, you can always have a pack of the commercial wipes available for easy travel or you can store a few of your homemade wipes in a Ziploc sandwich bags.  Whatever works best for you!

Do you have any tips for what you do that are more "outside the box?"  If so, feel free to leave suggestions in the "Comments" section.

In the meantime...

 
Keep Calm
and
Can On

Sunday, November 11, 2012

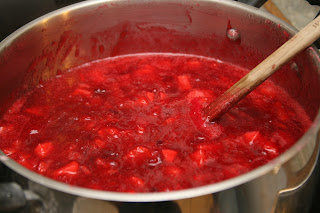
Canning Cranberry-Apple Preserves

Good afternoon, all!  We hope that you all are resting well and getting ready for another week. 

Yesterday, we headed to the local market to do our weekly stock-up of essentials.  With us, we took our handy "Ball Blue Book guide to preserving" to see what kind of canning fun we wanted to get into, at the time.  One of the first things that caught our eyes was their recipe for Cranberry-Apple Preserves.  So, that, it was!  Check it out...

The Goods:
  • 2 lbs cranberries
  • 3 green apples, cored, peeled, chopped
  • 1 orange, seeded and chopped
  • 3 cups sugar
  • 2 cups water
  • 1/2 cup honey
The Process:
  • Combine all of the ingredients in a large saucepot.
 
  • Bring slowly to a boil, stirring until the sugar dissolves.
  • Boil gently until almost to gelling point.
  • Skim foam if necessary.
  • Ladle hot preserves into hot jars, leaving 1/4 in headspace.
  • Put on caps, seals and collars per directions.
  • Process in a boiling-water canner 15 minutes.
Modifications and Specifications:
 
Relatively speaking, this is a really easy recipe.  If there was just one thing that we would have done differently, it would have been to cut the apples into slightly smaller chunks.  It would facilitate them breaking down just a bit more.  As is, though, no complaints. 
 
Since our local market had such large bulk bags of oranges and we didn't have any other orange recipes in mind, at the time, we went ahead and bought a couple of tangerines, instead.  Since the tangerines were a bit smaller than what a typical orange would be, we went ahead and used one and a half tangerines.  You wouldn't know the difference.
 
After you have combined all of the ingredients and are bringing them to a slow boil, you might have some confusion as to whether or not the sugar is dissolved.  This is really a non-issue.  All of the ingredients are combined anyways and you are boiling it during the entirety of the cooking process.  So, don't worry about dissolved sugar being any kind of an indicator.  I would stir pretty consistently throughout the process though.  At first, you will stir more to be sure that everything is being heated and broken down evenly.  After the fruits start to break down, you can stir less often, but still on a regular basis (every minute to two minutes or so).
 
If you are new to making preserves, jams and the like, you no doubt have questions about the "gelling point."  There are a couple of ways that you can test it.  The picture of the spoon shows us using the "Sheeting Test."  This is done by taking a table spoon of your substance, tipping the spoon to the side (as if to pour it out) and observing the reaction.  If you are getting more of a liquid consistency, it is obvious that the gelling point has not occurred.  When the substance starts to come off of the spoon as if in a sheet (thus, the name), you have reached the gelling point.  You can also use the "Plate Test" (cool some spread to room temperature on a plate, run your finger through it and, if it separates but goes back to its original form, it's at its gelling point) or by using a thermometer (determine boiling point for your altitude, add eight degrees Fahrenheit and, when your spread has reached that temperature, it will be at its gelling point).
 
As always, have your jars, lids, seals and collars "simmering" in a sauce pan of some kind while the entire process is occuring.  Once you have filled the jars and secured the lids and collars "fingertip" tight (or secure the lid as your normally would for processing and turn back 1/4 in.), you are ready to process them in your boiling-water canner.
 
Prior to removing your jars from the canner after processing, allow them to sit in the canner (while canner is removed from the heat, of course) so that they can gradually decrease their external temperature.  Immediately upon removal, tighten the collars as much as possible with a towel or oven mitt and let them cool on the counter for 24 hrs.
 
The Verdict:
 
Absolutely delicious!  From just the right balance of tartness and sweetness to the aesthetic appeal, this one is a real winner.  Another one that is a great gift to friends and loved ones for the upcoming holidays.  Again, the recipe is incredibly simple, though it does take a bit of time.  Another bonus is that it makes a decent amount of preserves.  The recipe states that it should make appoximately 9 half-pints of preserves.  In actuality, our batch made enough for 5 whole pints.  Always important, every one of our 4ever recap reusable plastic canning lids sealed!  We'll be enjoying this one for a pretty decent amount of time!


Have a favorite jelly or preserve that you would like to share?  Tell us about it in our "Comments" section!
 
Otherwise...
 
Keep Calm
and
Can On
 

Saturday, November 10, 2012

Meet Your New Favorite Canning Lid...

Ladies and Gentlemen, we introduce you to the 4ever recap canning lid...
  • BPA and Lead Free
  • Made in the USA
  • Dishwasher Safe
  • Premium Silicone Seals
  • USDA and FDA Approved Materials
  • 100% Satisfaction Guaranteed!
Starting off, you might have several different questions regarding canning and our premium reusable lids and seals.  While we are sure there are a number of things that we won't mention in this post, we will do our very best to help out with any questions you might have.  If you have a question that you don't see mentioned here, please, feel free to leave us a note in the "Comments" section below and we will do our best to address any questions or concerns!

Why turn to canning?
  • Enjoy foods outside of peak seasons.
  • Buy Local:  Locally grown produce and locally raised livestock have less of a tendency to be treated with harmful chemicals and genetic modifications than mass produced goods.  Plus, getting your foods from farmers markets and local delis contributes to your local economy. 
  • Reduce Grocery Costs:  Don't pay for all the processes it takes to get your food from the field to the manufacturer to the distributor to the store and, finally, to your kitchen table.
  • Increase Nutritional Value:  Commercially canned goods tend to have a high level of dietary sodium due to their preservation process.  Additionally, raw produce can lose nutrional value during all of the transit necessary to get to you.
Why the 4ever recap plastic reusable canning lid over traditional metal lids?
  • Reduce Waste:  Metal lids are meant to be used only once.  Continued use could degrade their ability to seal and leave you and your family at risk to many food bourne illnesses.  4ever recap canning lids can safely be used again and again.
  • Avoid BPA:  Bisphenol A is a chemical used to coat tin cans and metal canning lids to prevent rusting.  While much more is to be know about this chemical, there is overwhelming evidence showing that BPA is potentially harmful when used in containers that house foods and other consumed goods.  4ever recap reusable plastic canning lids are free of BPA!
  • Silicone For the Win:  While there are plenty of materials that we could have used for our seals, we chose a premium silicone seal.  These seals will not stretch or dry out and are super-resistant to nicks and cuts that may potentially occur while breaking the seal on a jar.
These are just a few of the considerations that came to mind when creating the 4ever recap canning lids.  Again, we are sure there are a number of other questions that you might have.  Please, don't be shy.  Leave a comment and we will do our best to help out in any way possible!

With that being said, 4ever recap canning lids are officially for sale in the "Shop" section of 4everrecap.com .  We would appreciate you trying them out and letting us know what you think!

And remember...

Keep Calm
and
Can On

Thursday, November 8, 2012

Family Favorite: Scotcharoos!

Alright, I know that this has nothing to do with canning, but this is such a family favorite that I feel like I am committing a first degree felony if I don't share this with everyone else. 

Beware:  Once you make this recipe, any time a family member sees you pull any of the associated ingredients out of the pantry, whether you have any intentions of making them or not, they will automatically start pulling out whatever you haven't gotten already in anticipation that magical goodness is about to be made.

The Goods:
  • 1 c Kairo (any light corn syrup will do)
  • 1 c White Granulated Sugar
  • 1 c Peanut Butter
  • 1 c Chocolate Morsels
  • 1 c Butterscotch Morsels
  • A bunch of any brand of rice cereal (i.e. Rice Krispies) - this will be explained later
How to Make The Magic Happen:
  • Over high heat, add the Kairo and sugar to a small sauce pan.  Allow mixture to heat up to the point of making a few bubbles.  We're not talking "Boil, boil, toil and trouble."  Just enough so that you know that it's good and hot to help dissolve the sugar and to allow the peanut butter to mix well.
  • Once you have the few bubbles forming, remove the sauce pan from heat.
  • Add peanut butter and stir until you have an even consistency.
  • Once the peanut butter is nice and mixed with the Kairo and sugar mixture, it's time for the rice cereal.
  • Now, I understand that this isn't scientific, but add in cereal bit by bit until you have fully utilized the mixture while not adding too much cereal where you have pieces not covered.  Basically, you shouldn't have dry cereal and you shouldn't have a bunch of goo (again, not scientific) at the bottom of the sauce pan.
  • Now that you have the mixture completed, spread evenly into a 9" x 13" pan.
  • For the topping, add the chocolate and butterscotch morsels into a glass bowl. 
  • Heat in microwave for one minute increments, stirring between minutes.
  • When the morsels are completely melted and mixed together, evenly spread the mixture onto the crispie goodness in your pan.
  • Let cool until chocolate topping has solidified.
  • Eat and smile.

 
Keep Calm
and
Can On

Cinnamon Apples in Red Hot Syrup

Not only do these make for some pretty neat looking jars, but they are pretty darn good too.  Now, I say that with the warning that they take a specific taste as the Red Hots and cloves pretty much make the flavor.  Either way, give it a try and let me know what you think!  To give credit where credit is due, I found these on the Sustainable Life Blog.

Per the normal format, I will give you the recipe and directions as I found them and then give you some of the modifications that I made.

What You Need:
  • 8-10 lbs apples
  • 1 1/2 c sugar
  • 1/2 cup red hots (these were rather difficult to find, but I found them at Walgreen's)
  • 2 sticks cinnamon
  • 2 teaspoons whole cloves
  • 1 teaspoon ginger
  • 2 c water
  • 1 1/2 c vinegar
  • 2/3 c light corn syrup
Directions:

First, you’ll need to wash, core, peel and cut the apples. I cut my apples into eighths, but I’d assume quarters would probably work as well. This took me quite a bit of time, and while you’re peeling some, have some lemon juice (or something else) handy to treat the cut apples from turning brown while you cut the rest of them. Combine everything but the apples in a large (bigger than 3.5 quarts) pot and bring to a boil. Put apple wedges into the syrup and simmer for 4 minutes. Pack hot apples into the jars, leaving about half an inch headspace (headspace is the amount of space between the top of your goodies and the lid of the jar, and my little kit came with a handy measuring tool). Pour the syrup into the jars, leaving half inch of headspace here as well. Run a knife around the inside edge of the jar to remove air bubbles, and put the lids on. Place in your boiling water canner for 15 minutes.
Note: This time is only for those of you at sea level or lower than 1,000 feet. As altitude increases, so will boiling time, and you’ll need to account for that. Most boxes of jars have a table on them to guide you.

Once you are ready to take them out, set them on a towel and leave them sit for 24 hours. You’ll be able to hear the jars sealing (a pop noise) but leave them there for at least 24 hours. Then you can take the rings off (so you can see if a seal has gone bad from the time you canned to the time you want to eat) and enjoy!


Modifications:

  • First of all, I just went ahead and used three apples to start off.  Not that I wasn't sure that I'd like the recipe, but I always start out  with smaller batches when trying something new.
  • That being said, I kept the rest of the ingredients at their suggested levels so that, if I was a big fan, I would have plenty of syrup later on to make another batch (which I will).
  • While I am preparing my apples and syrup, I have the lids and gaskets "simmering" in a pan until they are ready to use.
  • Before I put the cans into the pressure canner, I lay the rubber gasket on the rim of the jar, lay the plastic lid on top and (while holding the lid to keep it centered), apply the metal collar. I tighten them snugly (no Hulk hands necessary) and, then, turn it back 1/4" and that allows the air to properly vent out of the jar to create a sufficient vacuum.
  • Upon removal from the canner, each lid collar is tightened as much as possible to fully secure the lid and create the greatest vacuum possible as the contents cool.
The Verdict:

Again, the finished product is pretty neat looking.  If you know someone who might be a fan, you could always gift them for the holidays.  As for the flavor, it seems like it'd be a winner.  I am going to give it another go with a small batch tomorrow, though.  I think it is a little heavy on the cloves, for my taste.  The Red Hots do give a really great flavor, though.  I have seen suggestions that you can use these as an ice cream topper or eat them separately as a nice little snack.  I am going to do some digging around for a recipe that I want to try tomorrow.  Since this is a pretty quick little recipe, I will work on a small little batch too.  I will throw up a quick blurb about how the reduction in cloves worked out.

Until then...

Keep Calm
&
Can On

Wednesday, November 7, 2012

Super, Big, Huge Launch Giveaway!

Okay.  So, maybe the title is a little over the top, but it's kind of a big deal.

First of all, we want to thank you for your early support.  We have only really had a presence online for 5 days and, already, we have 30 "Likes" on Facebook, visitors from all over the nation to our website and a good base of Tweeps following us on Twitter.  It's really a great start, but we have a long way to go before we reach the canning masses.

So, here's the deal:

From now until 1159 pm EST on 11/10, we are giving our followers a chance to win a free 12 ct. Combo Pack of our lids with gaskets (all you have to do is pay S&H, try them out and write us a review).  "How do I enter this awesomely amazing contest?" you ask. 

Here's how:

Mention us on Twitter = 1 entry.  "Like" on Facebook = 1 entry.  Have a new follower to either one mention that you referred them, another like.  Saturday night, we will randomly draw 2 names to receive the combo packs (one from Facebook and one from Twitter).  Also, anyone that you refer can join in on the fun too because they will receive an entry when they follow us and/or refer someone else!  Just make sure that they post that you referred them!

So, you know what to do.  "Like" our Facebook page.  "Share" our statuses.  "Retweet" our tweets.  "Mention" us to your Tweeps!

Most importanly...

Keep Calm
&
Can On

Tuesday, November 6, 2012

Canning Beef Stew

Welp, here goes nothing...  My first crack at beef stew:

I found this recipe via a fellow Blogger, Iowa Sue!  First, I will just provide you with the recipe and instructions, then I will give you a rundown on some of the adjustments that I made and a full review!

Ingredients:

2.5 lbs Rump Roast, Trimmed - 1.25 in. cubes
1 lb potatoes - 1 in. cubes
1 lb carrots - .5 in. slices
6 oz. celery - .5 in. slices
8 oz. onion - coarsely chopped
2 tsp minced garlic
1 qt water
4 tsp ketchup - .5 tsp per jar
4 tsp Worcestershire sauce - .5 tsp per jar
4 tsp beef base - .5 tsp per jar


Process:
  • Brown meat on half sheet pains in 400* oven for 15 min., turn and brown additional 10 - 15 min.  Keep warm.
  • Prepare carrots, celery and onion, peel and dice potatoes last.  Add vegetables to 6 - 8 quart pot, cover with tater; bring to a boil.  Remove from heat.  VEGETABLES DO NOT HAVE TO COOK.  Turn off heat.
  • Wash jars, keep warm until filling.  Heat lids in hot water for 10 min. until ready to use.  DO NOT BOIL LIDS.
  • Add seasoning per jar.  Divide beef among jars.  Divide veggies among jars.  Pour hot meat juices, then hot water into hot jars, leaving 1 in. head space.  Remove bubbles with plastic knife and wipe jar rim carefully with hot wipe before sealing.  Cover and seal, place in pressure canner with 3 quarts simmering water), exhaust steam 10 minutes, process in pints 1 hr. and 15 min. at 10 lbs of pressure up to 1000 ft. elevation.  Let pressure drop of own accord (about 30 minutes), open canner remove jars to clean towel and let cool and seal, setting apart to allow air to circulate.  Remove rings and wash jar carefully.
Modifications:

  • Based on own personal preferences and differences in canning with the 4ever recap lids vs. traditional metal canning lids, there were a couple of modifications that I made.
    • In place of the 1 qt of water that you add in to the jars with the hot meat juice, I actually used the water that the vegetables had blanched in so that I could catch a bit more of the flavor from the onions and what not.
    • Speaking of onions, I chose to cut them into 1/8 pieces.  The "other half" is not so fond of onions and this allows the stew to catch the full flavor that the onions provide, but also allow anyone with aversions to onions to pic them out easily.
    • When cooking the meat in a "half sheet pan," I used two glass casserole dishes so that I could easily transfer the juices into the jars.

    • While I am preparing my veggies and meat, I have the lids and gaskets "simmering" in a pan until they are ready to use.
    • Before I put the cans into the pressure canner, I lay the rubber gasket on the rim of the jar, lay the plastic lid on top and (while holding the lid to keep it centered), apply the metal collar.  I tighten them snugly (no Hulk hands necessary) and, then, turn it back 1/4" and that allows the air to properly vent out of the jar to create a sufficient vacuum.

    • Upon removal from the canner, each lid collar is tightened as much as possible to fully secure the lid and create the greatest vacuum possible as the contents cool.

The verdict:

After 8 pint sized jars, I am happy to say that there was a 100% success rate with the 4ever recap lids and seals.  Better yet, we had the stew this afternoon for lunch and...  DELISH!  I was slightly worried that the beef would over cook or that the vegetables would lose their crisp.  Fortunately, neither of these things happened.  Prep work was a cinch too:  Just take two pint sized jars, make enough beef broth to obtain your desired amount, heat up in a small pot and viola!  The veggies and beef had a great flavor and the meat literally fell apart in your mouth. 

Now, I will say that there is a bit more to the use of the 4ever recap lids and seals.  For more information on that, please, head on over to  The 4ever recap Website and click on "Utilization."

You can also reach out to us on Twitter @4everrecap and on our Facebook page!  While there, don't forget to "Like" or "Follow" us!

The Rebirth of an Old Idea...

The canning process has been around for over 200 years. Along the way, canning methods have changed and evolved countless times to streamline the process and ensure food safety.

We've been a canning family for several generations. Our family cans our own produce, meat, sauces and soups for two primary reasons:
...

1) We're frugal about our grocery budget

2) We want to know what goes into the food we're feeding our family

Grandma used to can with glass lids and rubber gaskets. She was able to reuse her products year after year with little to no waste. Her process was eventually abandoned because the rubber gaskets had a tendancy to fail. Disposable, metal lids then became the standard. We think that Grandma was on to something. Not only would a reusable lid offer an affordable, long term canning option; but eliminating metals lids would save upwards of 75 million pounds of waste from our landfills each year. This concept motivated us to design 4ever recap canning lids.

4ever recap lids are made of BPA-free plastic which is an FDA and USDA approved, food-grade material. The plastic lids meet CFR guidelines. We upgraded the original rubber gasket by replacing it with an unbeatable silicon gasket. The silicon gasket will not stretch or dry out. It is not suseptable to nicks and cuts like other gaskets. The 4ever recap lid and gasket combination is a superior product that will truly allow you to use and reuse your lids endlessly. The lids and gaskets also store neatly with our smart-stack design for off-season storage.

We are so confident in the quality of our product that we're backing it with a "no questions asked" guarantee. If you are unhappy with our product for any reason, simply return it for a replacement or a refund.

Our goal is to offer the best product in the business while also providing the most affordable, eco-friendly option for home canning. We treat our customers like they are part of our family and we'd love for you to try our lids and services today!

Greetings!

Hello and thanks for visiting the 4ever recap blog!

The purpose of this blog is not only to tell you about our outstanding product, 4ever recap, but also to create yet another community of individuals excited about returning to the principles of our preceding generations in an attempt to gain independence from rising commodity prices, market uncertainty and general complication of life.

From using cloth diapers and making our own laundry detergent to producing our own baby wipes, canning locally grown and raised fruits, vegetables and lifestock, we want to be able to simplify the way that we live and continuously grow in our independence.  Thus, the creation of 4ever recap, a reusable canning lid that encourages waste reduction and frugal canning practices.

That all being said, this blog will not only focus on the wonderful world of canning, but also other things that we do to perpetuate our self-sustaining lifestyle.

So, without further ado...